Hi,
I am trying to install OpenRemote on a Raspberry pi, but I am not very succesful yet.
Maybe some one can help me.
I made a panel in the designer and my Zwave log looks like this:
OpenRemote Z-Wave protocol version : ‘3.0.0’
Hi,
I am trying to install OpenRemote on a Raspberry pi, but I am not very succesful yet.
Maybe some one can help me.
I made a panel in the designer and my Zwave log looks like this:
OpenRemote Z-Wave protocol version : ‘3.0.0’
Node 1 is the controller. I don't think there is a xml file created for the controller in the zwave folder. Once you add sensors/ switches to your zwave network, it will create node files for each one of them.
I added the sensors and switches äs described in the Open remote instructions and created a panel in the designer.
In the log I can see that your Z-Wave network contains only the controller - there are no other devices in the network :
DEBUG 2017-09-14 16:03:58,344 (Z-Wave): Controller : The Z-Wave node list has been successfully retrieved : [1].
You have to include a Z-Wave device to the Z-Wave network otherwise it’s not possible for the controller to communicate with it (see Z-Wave Node Incusion).
I have included an Aoetec Zwave stick with the following commands:
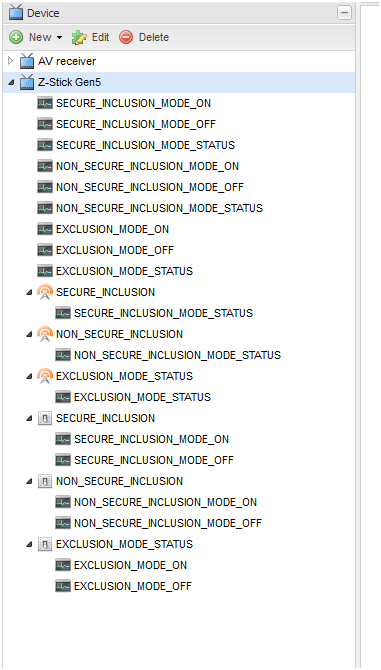
Now you will need to create a switch for the inclusion mode on the building modeler module in the designer and the synch the controller
(Localhost:8688/controller)- use you Openremote login credentials.
then you should enable the inclusion mode for the controller through the Openremote app/panel on your phone and bring your sensor with in a foot of the zstick and use the instructions on the sensor to put it in the inclusion mode- you will see some activity on the leds on the zstick (flicker blue fast for a few seconds) then check the zwave folder to see if a new node file is created.
Once the device is associated and node file is created, you will need to create commands and sensors in the designer specific to that sensor and appropriate display on the building modeler module in the designer and the resynch the controller again.
Good luck!
Ok, I also already did create a switch on the building modeller A Secure_Inclusion switch, but when I press the button it comes back with the message: ‘Send Request Error Command not found.’
The boot.log file keeps coming up with this:
DEBUG 2017-09-23 09:56:37,930 : Connecting user ‘egbert.lanting’ to ‘https://designer.openremote.com/ccs/rest/commands/4584’
Connection Timeout : 15,000
Response Timeout : 10,000
TRACE 2017-09-23 09:56:39,244 : Remote command check waiting for next connection attempt in 30,000 ms…
TRACE 2017-09-23 09:56:39,244 : Remote command check waiting for next connection attempt in 30,000 ms…
You are using Z-Wave version 3.0.0 which does not support the (explicit) secure inclusion commands (see Z-Wave Secure Inclusion). The secure inclusion commands are supported beginning with version 3.2.1 which is included in OpenRemote Controller Version 2.6.0 (Beta 3) (see OpenRemote controller releases). Z-Wave version 3.0.0 supports only the commands INCLUSION_MODE_ON, INCLUSION_MODE_OFF and INCLUSION_MODE_STATUS.
I updated the controller to version 3.2.1 and now I can enable the inclusion mode on the controller.
When I try to include a sensor ((Fibaro dimmer2 FGD-212) nothing happens.
in the Zwave.log file I can see that the controller is in the inclusion mode, but I see no changes on my Z-stick. Also If I put the sensor in inclusion mode there is no blue flicker for a few seconds on the z-stick.
I will attach the zwave log file and hope you can help me some steps forward.
zwave.log (181 KB)
The log looks good.
Adding devices to the Z-Wave network can be from time to time a finicky process. In your case you should do the following:
1.) Place the dimmer within direct range of the controller
2.) Put the controller into secure inclusion mode
3.) Press the ‘B-button’ (see manual) of the Fibaro Dimmer quickly 3 times in successive row
Note that the timing when you press the ‘B-button’ has to be right (not too slow/not too fast). So play around with the timing and get a feel for it.
I finally succeeded in including a zwave device, you where right I had to try it several times.
So now I should edit the node 2.xml file and put an assocation in it, is that right?
Yes that’s right now you have to configure an association from the device to the controller otherwise the device doesn’t know where to send a status update when the dimmer is operated locally by means of a physical switch that is attached to the dimmer.
Proceed as follows (see also Association Configuration) :
1.) Open the node2.xml file in a editor
2.) Add an association (that points to the controller) to the first association group (‘lifeline’ group)
... ... 1 ... ... ... ...``
3.) Restart the controller
Note that adding an association to the ‘lifeline’ association group will be done automatically at inclusion time of a device in a future Z-Wave version.
I did it before I saw your message, but I used the last assocation group.
1The dimmer works ok on and off and I also am able to dim the lights, but there is no status update to the panel screen.
I will change the assocation to the first group and see what happens.
Could you tell me what the purpose is of the different assocationgroups?
The first association group is used to send status updates to the controller. The other associations come into play when you want to control other devices directly that means in a decentralized way without the controller. Controlling a single light with more than one Z-Wave switch/dimmer would be an example. In this scenario only one Z-Wave dimmer is attached to the load (light bulb). The other Z-Wave dimmers/switches are linked to the Z-Wave device with the connected light bulb by means of associations.
In general you have to read the manual of the Z-Wave device in order to get detailed information about all supported associations (see Fibaro Dimmer FGD-212). Often times the retail package doesn’t contain the printed device manual. In this case you have to download the device manual from the manufacturer’s website.